 2.6 使用gdb调试多线程程序
前面我们实际上已经介绍了多线程的调试方法,这节我们来专门进行一下总结,同时这个方法也是我阅读和分析一个新的C/C++项目常用的方法。
当然,多线程调试的前提是你需要熟悉多线程的基础知识,包括线程的创建和退出、线程之间的各种同步原语等。多线程编程的内容我们将在第三章详细介绍。
# 2.6.1 调试多线程的方法
使用gdb将程序跑起来,然后按Ctrl + c将程序中断下来,使用
info threads命令查看当前进程有多少线程。31995:M 25 Aug 2020 14:35:43.964 * Ready to accept connections ^C Thread 1 "redis-server" received signal SIGINT, Interrupt. 0x00007ffff71e2603 in epoll_wait () from /usr/lib64/libc.so.6 (gdb) info threads Id Target Id Frame * 1 Thread 0x7ffff7feb740 (LWP 31995) "redis-server" 0x00007ffff71e2603 in epoll_wait () from /usr/lib64/libc.so.6 2 Thread 0x7ffff0bb9700 (LWP 31999) "bio_close_file" 0x00007ffff74bc965 in pthread_cond_wait@@GLIBC_2.3.2 () from /usr/lib64/libpthread.so.0 3 Thread 0x7ffff03b8700 (LWP 32000) "bio_aof_fsync" 0x00007ffff74bc965 in pthread_cond_wait@@GLIBC_2.3.2 () from /usr/lib64/libpthread.so.0 4 Thread 0x7fffefbb7700 (LWP 32001) "bio_lazy_free" 0x00007ffff74bc965 in pthread_cond_wait@@GLIBC_2.3.2 () from /usr/lib64/libpthread.so.0 (gdb)1
2
3
4
5
6
7
8
9
10
11
还是以redis-server为例,当使用gdb将程序运行起来后,我们按Ctrl + c将程序中断下来,此时可以使用info threads命令查看redis-server有多少线程,每个线程正在执行哪里的代码。
使用
thread 线程编号可以切换到对应的线程去,然后使用bt命令可以查看对应线程从顶到底层的函数调用,以及上层调用下层对应的源码中的位置;当然,你也可以使用frame 栈函数编号(栈函数编号即下图中的#0 ~ #4,使用frame命令时不需要加#)切换到当前函数调用堆栈的任何一层函数调用中去,然后分析该函数执行逻辑,使用print等命令输出各种变量和表达式值,或者进行单步调试。(gdb) thread 1 [Switching to thread 1 (Thread 0x7ffff7feb740 (LWP 31995))] #0 0x00007ffff71e2603 in epoll_wait () from /usr/lib64/libc.so.6 (gdb) bt #0 0x00007ffff71e2603 in epoll_wait () from /usr/lib64/libc.so.6 #1 0x0000000000428b0e in aeApiPoll (eventLoop=0x5e5760, tvp=0x7fffffffe140) at ae_epoll.c:112 #2 0x0000000000429864 in aeProcessEvents (eventLoop=0x5e5760, flags=27) at ae.c:447 #3 0x0000000000429b44 in aeMain (eventLoop=0x5e5760) at ae.c:539 #4 0x0000000000437375 in main (argc=1, argv=0x7fffffffe308) at server.c:5175 (gdb)1
2
3
4
5
6
7
8
9
10
如上图所示,我们切换到了redis-server的1号线程,然后输入bt命令查看该线程的调用堆栈,发现顶层是main函数,说明这是主线程,同时得到从main开始往下各个函数调用对应的源码位置,我们可以通过这些源码位置来学习研究调用处的逻辑。对每个线程都进行这样的分析之后,我们基本上就可以搞清楚整个程序运行中的执行逻辑了。
接着我们分别通过得到的各个线程的线程函数名去源码中搜索,找到创建这些线程的函数(下文为了叙述方便,以f代称这个函数),再接着通过搜索f或者给f加断点重启程序看函数f是如何被调用的,这些操作一般在程序初始化阶段。
redis-server 1号线线程是在main函数中创建的,我们再看下2号线程的创建,使用
thread 2切换到2号线程,然后使用bt命令查看2号线程的调用堆栈,得到2号线程的线程函数为bioProcessBackgroundJobs,注意在顶层的clone和start_thread是系统函数,我们找的线程函数应该是项目中的自定义线程函数。
通过在项目中搜索
bioProcessBackgroundJobs函数,我们发现bioProcessBackgroundJobs函数在bioInit中被调用,而且确实是在bioInit函数中创建了线程2,因此我们看到了pthread_create(&thread,&attr,bioProcessBackgroundJobs,arg) != 0)这样的调用。
//bio.c 96行
void bioInit(void) {
    //...省略部分代码...

    for (j = 0; j < BIO_NUM_OPS; j++) {
        void *arg = (void*)(unsigned long) j;
        //在这里创建了线程 bioProcessBackgroundJobs
        if (pthread_create(&thread,&attr,bioProcessBackgroundJobs,arg) != 0) {
            serverLog(LL_WARNING,"Fatal: Can't initialize Background Jobs.");
            exit(1);
        }
        bio_threads[j] = thread;
    }
}
2
3
4
5
6
7
8
9
10
11
12
13
14
此时,我们可以继续在项目中查找bioInit函数,看看它在哪里被调用的,或者直接给bioInit函数加上断点,然后重启redis-server,等断点触发,使用bt命令查看此时的调用堆栈就知道bioInit 函数是在何处被调用的了。
(gdb) b bioInit
Breakpoint 1 at 0x498e5e: file bio.c, line 103.
(gdb) r
The program being debugged has been started already.
Start it from the beginning? (y or n) y
Starting program: /root/redis-6.0.3/src/redis-server
[Thread debugging using libthread_db enabled]
//...省略部分无关输出...
Breakpoint 1, bioInit () at bio.c:103
103         for (j = 0; j < BIO_NUM_OPS; j++) {
(gdb) bt
#0  bioInit () at bio.c:103
#1  0x0000000000431b5d in InitServerLast () at server.c:2953
#2  0x000000000043724f in main (argc=1, argv=0x7fffffffe318) at server.c:5142
(gdb)
2
3
4
5
6
7
8
9
10
11
12
13
14
15
至此我们发现2号线程是在main函数中调用了InitServerLast函数,后者又调用bioInit函数,然后在bioInit函数中创建了新的线程bioProcessBackgroundJobs,我们只要分析这个执行流就能搞清楚这个逻辑流程了。
同样的道理,redis-server还有3号和4号线程,我们也可以按分析2号线程的方式去分析3号和4号,读者可以自行尝试。
以上是笔者阅读一个不熟悉的C/C++项目常用方法,当然对于一些特殊的项目源码,读者还需要去了解一下该项目的业务内容,因为只有结合业务才能看懂各个线程调用栈以及初始化各个线程函数过程中的业务逻辑。
# 2.6.2 调试时控制线程切换
在调试多线程程序时,有时候我们希望执行流一直在某个线程执行,而不是切换到其他线程,有办法做到这样吗?
为了说明清楚这个问题,我们假设现在调试的程序有5个线程,除了主线程,其他4个工作线程的线程函数都是下面这样一个函数:
void* worker_thread_proc(void* arg)
{
    while (true)
    {
    	//代码行1
        //代码行2
        //代码行3
        //代码行4
        //代码行5
        //代码行6
        //代码行7
        //代码行8
        //代码行9
        //代码行10
        //代码行11
        //代码行12
        //代码行13
        //代码行14
        //代码行15
    }
}
2
3
4
5
6
7
8
9
10
11
12
13
14
15
16
17
18
19
20
21
为了方便表述,我们把四个工作线程分别叫做A、B、C、D。
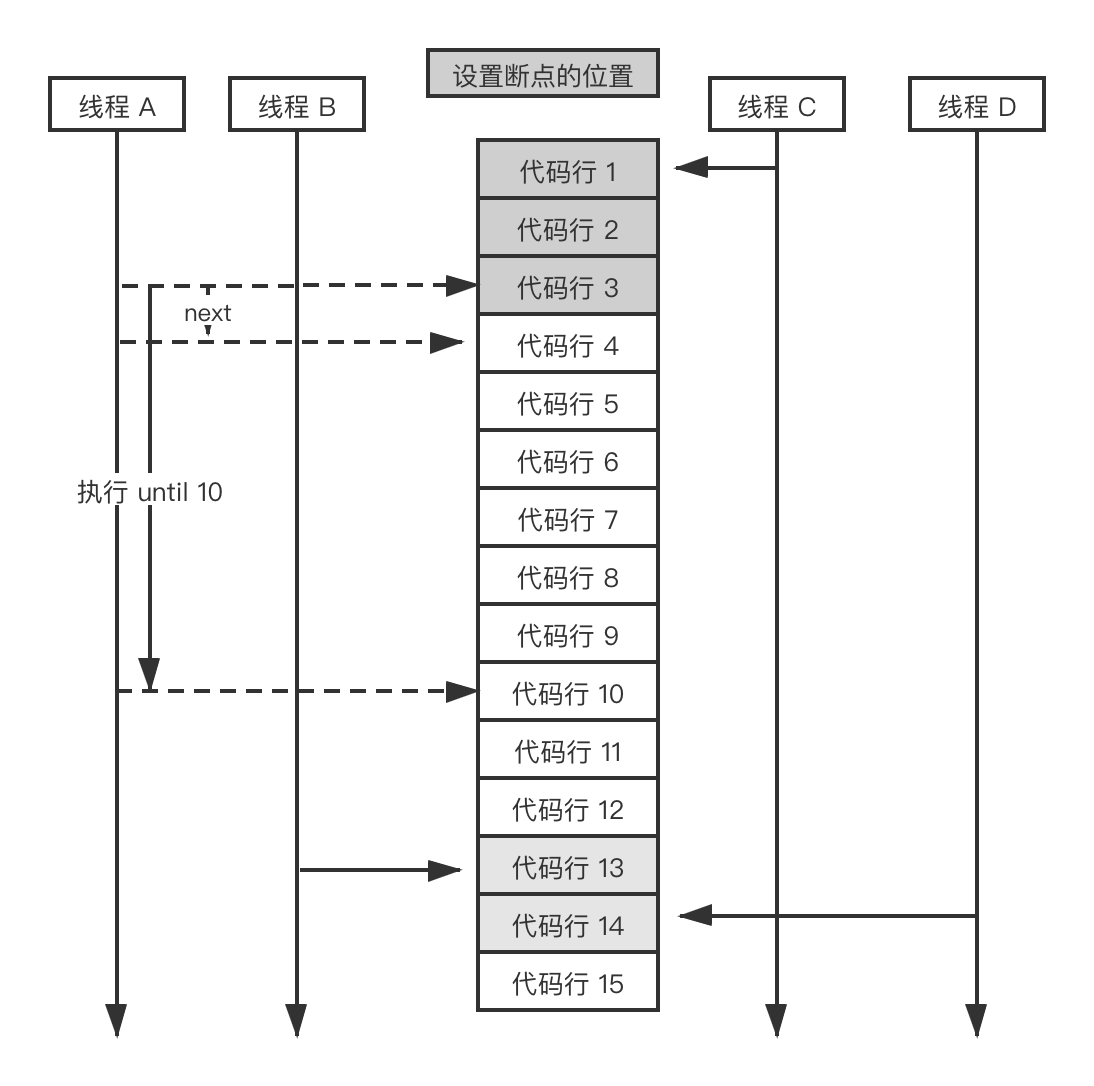
如上图所示,假设某个时刻, 线程A的停在代码行3处,线程B、C、D停留位置代码行1 ~ 15任一位置,此时线程A是gdb当前调试线程,此时我们输入next命令,期望调试器跳转到代码行4处;或者输入util 10命令,期望调试器跳转到代码行10处。但是实际情况下,如果代码行1、代码行2、代码行13 或者代码行14处设置了断点,gdb再次停下来的时候,可能会停在代码行1 、代码行2 、代码行13、代码行14这样的地方。
这是多线程程序的特点:当我们从代码行4处让程序继续运行时,线程A虽然会继续往下执行,下一次应该在代码行14处停下来,但是线程B、C、D也在同步运行呀,如果此时系统的线程调度将 CPU 时间片切换到线程B、C或者D呢?那么gdb最终停下来的时候,可能是线程B、C、D触发了代码行1 、代码行2 、代码行13、代码行14 处的断点,此时调试的线程会变为B、C或者D,而此时打印相关的变量值,可能就不是我们期望的线程A函数中的相关变量值了。
还存在一个情况,我们单步调试线程A时,我们不希望线程A函数中的值被其他线程改变。
针对调试多线程程序存在的上述状况,gdb提供了一个将程序执行流锁定在当前调试线程的命令选项——scheduler-locking选项,这个选项有三个值,分别是on、step和off,使用方法如下:
set scheduler-locking on/step/off
set scheduler-locking on可以用来锁定当前线程,只观察这个线程的运行情况, 当锁定这个线程时, 其他线程就处于了暂停状态,也就是说你在当前线程执行next、step、until、finish、return命令时,其他线程是不会运行的。
需要注意的是,你在使用set scheduler-locking on/step选项时要确认下当前线程是否是你期望锁定的线程,如果不是,可以使用thread + 线程编号切换到你需要的线程再调用set scheduler-locking on/step进行锁定。
set scheduler-locking step也是用来锁定当前线程,当且仅当使用next或step命令做单步调试时会锁定当前线程,如果你使用until、finish、return等线程内调试命令(它们不是单步控制命令),所以其他线程还是有机会运行的。相比较on选项值,step选项值为单步调试提供了更加精细化的控制,因为在有些场景下,我们希望单步调试时,其他线程不要对所属当前线程的变量值造成影响。
set scheduler-locking off用于释放锁定当前线程。
我们以一个小的示例来说明这三个选项的使用吧。编写如下代码:
01 #include <stdio.h>
02 #include <pthread.h>
03 #include <unistd.h>
04
05 long g = 0;
06
07 void* worker_thread_1(void* p)
08 {
09    while (true)
10	  {
11		  g = 100;
12		  printf("worker_thread_1\n");
13		  usleep(300000);
14	  }
15
16	  return NULL;
17 }
18
19 void* worker_thread_2(void* p)
20 {
21	 while (true)
22 	 {
23		 g = -100;
24		 printf("worker_thread_2\n");
25		 usleep(500000);
26	 }
27
28	 return NULL;
29 }
30
31 int main()
32 {
33	 pthread_t thread_id_1;
34	 pthread_create(&thread_id_1, NULL, worker_thread_1, NULL);
35	 pthread_t thread_id_2;
36	 pthread_create(&thread_id_2, NULL, worker_thread_2, NULL);
37
38	 while (true)
39	 {
40		 g = -1;
42		 printf("g=%d\n", g);
42		 g = -2;
43		 printf("g=%d\n", g);
44		 g = -3;
45		 printf("g=%d\n", g);
46		 g = -4;
47		 printf("g=%d\n", g);
48
49		 usleep(1000000);
50 	 }
51
52	 return 0;
53 }
2
3
4
5
6
7
8
9
10
11
12
13
14
15
16
17
18
19
20
21
22
23
24
25
26
27
28
29
30
31
32
33
34
35
36
37
38
39
40
41
42
43
44
45
46
47
48
49
50
51
52
53
上述代码在主线程(main函数所在的线程)中创建了两个工作线程,主线程接下来的逻辑是在一个循环里面依次将全局变量g修改成-1、-2、-3、-4,然后休眠1秒;工作线程worker_thread_1、worker_thread_2在分别在自己的循环里面将全局变量g修改成100和-100。
我们编译程序后将程序使用gdb跑起来,三个线程同时运行,交错输出:
[root@myaliyun xx]# g++ -g -o main main.cpp -lpthread
[root@myaliyun xx]# gdb main
...省略部分无关输出...
Reading symbols from main...
(gdb) r
Starting program: /root/xx/main
[Thread debugging using libthread_db enabled]
...省略部分无关输出...
[New Thread 0x7ffff6f56700 (LWP 402)]
worker_thread_1
[New Thread 0x7ffff6755700 (LWP 403)]
g=-1
g=-2
g=-3
g=-4
worker_thread_2
worker_thread_1
worker_thread_2
worker_thread_1
worker_thread_1
g=-1
g=-2
g=-3
g=-4
worker_thread_2
worker_thread_1
worker_thread_1
worker_thread_2
worker_thread_1
g=-1
g=-2
g=-3
g=-4
worker_thread_2
worker_thread_1
worker_thread_1
worker_thread_2
2
3
4
5
6
7
8
9
10
11
12
13
14
15
16
17
18
19
20
21
22
23
24
25
26
27
28
29
30
31
32
33
34
35
36
37
我们按Ctrl + c将程序中断下来,如果当前线程不在主线程,可以先使用info threads和thread id切换到主线程:
^C
Thread 1 "main" received signal SIGINT, Interrupt.
0x00007ffff701bfad in nanosleep () from /usr/lib64/libc.so.6
(gdb) info threads
  Id   Target Id                               Frame
* 1    Thread 0x7ffff7feb740 (LWP 1191) "main" 0x00007ffff701bfad in nanosleep () from /usr/lib64/libc.so.6
  2    Thread 0x7ffff6f56700 (LWP 1195) "main" 0x00007ffff701bfad in nanosleep () from /usr/lib64/libc.so.6
  3    Thread 0x7ffff6755700 (LWP 1196) "main" 0x00007ffff701bfad in nanosleep () from /usr/lib64/libc.so.6
(gdb) thread 1
[Switching to thread 1 (Thread 0x7ffff7feb740 (LWP 1191))]
#0  0x00007ffff701bfad in nanosleep () from /usr/lib64/libc.so.6
(gdb)
2
3
4
5
6
7
8
9
10
11
12
然后在代码11行和41行各加一个断点。我们反复执行until 48命令,发现工作线程1和2还是有机会被执行的。
(gdb) b main.cpp:41
Breakpoint 1 at 0x401205: file main.cpp, line 41.
(gdb) b main.cpp:11
Breakpoint 2 at 0x40116e: file main.cpp, line 11.
(gdb) until 48
0x00007ffff704c884 in usleep () from /usr/lib64/libc.so.6
(gdb)
worker_thread_2
[Switching to Thread 0x7ffff6f56700 (LWP 1195)]

Thread 2 "main" hit Breakpoint 2, worker_thread_1 (p=0x0) at main.cpp:11
11                      g = 100;
(gdb)
worker_thread_2
[Switching to Thread 0x7ffff7feb740 (LWP 1191)]

Thread 1 "main" hit Breakpoint 1, main () at main.cpp:41
41                      printf("g=%d\n", g);
(gdb)
worker_thread_1
worker_thread_2
g=-1
g=-2
g=-3
g=-4
main () at main.cpp:49
49                      usleep(1000000);
(gdb)
worker_thread_2
[Switching to Thread 0x7ffff6f56700 (LWP 1195)]

Thread 2 "main" hit Breakpoint 2, worker_thread_1 (p=0x0) at main.cpp:11
11                      g = 100;
(gdb)
2
3
4
5
6
7
8
9
10
11
12
13
14
15
16
17
18
19
20
21
22
23
24
25
26
27
28
29
30
31
32
33
34
现在我们再次将线程切换到主线程(如果gdb中断后当前线程不是主线程的话),执行set scheduler-locking on命令,然后继续反复执行until 48命令。
(gdb) set scheduler-locking on
(gdb) until 48

Thread 1 "main" hit Breakpoint 1, main () at main.cpp:41
41                      printf("g=%d\n", g);
(gdb) until 48
g=-1
g=-2
g=-3
g=-4
main () at main.cpp:49
49                      usleep(1000000);
(gdb) until 48

Thread 1 "main" hit Breakpoint 1, main () at main.cpp:41
41                      printf("g=%d\n", g);
(gdb)
g=-1
g=-2
g=-3
g=-4
main () at main.cpp:49
49                      usleep(1000000);
(gdb) until 48

Thread 1 "main" hit Breakpoint 1, main () at main.cpp:41
41                      printf("g=%d\n", g);
(gdb)
g=-1
g=-2
g=-3
g=-4
main () at main.cpp:49
49                      usleep(1000000);
(gdb) until 48

Thread 1 "main" hit Breakpoint 1, main () at main.cpp:41
41                      printf("g=%d\n", g);
(gdb)
2
3
4
5
6
7
8
9
10
11
12
13
14
15
16
17
18
19
20
21
22
23
24
25
26
27
28
29
30
31
32
33
34
35
36
37
38
39
我们再次使用until命令时,gdb锁定了主线程,其他两个工作线程再也不会被执行了,因此两个工作线程无任何输出。
我们再使用set scheduler-locking step模式来锁定一下主线程,然后反复执行until 48命令。
(gdb) set scheduler-locking step
(gdb) until 48
worker_thread_2
worker_thread_1
g=-100
g=-2
g=-3
g=-4
main () at main.cpp:49
49                      usleep(1000000);
(gdb) until 48
worker_thread_2
[Switching to Thread 0x7ffff6f56700 (LWP 1195)]

Thread 2 "main" hit Breakpoint 2, worker_thread_1 (p=0x0) at main.cpp:11
11                      g = 100;
(gdb) until 48
worker_thread_2
worker_thread_1

Thread 2 "main" hit Breakpoint 2, worker_thread_1 (p=0x0) at main.cpp:11
11                      g = 100;
(gdb) until 48
worker_thread_2
[Switching to Thread 0x7ffff7feb740 (LWP 1191)]

Thread 1 "main" hit Breakpoint 1, main () at main.cpp:41
41                      printf("g=%d\n", g);
(gdb) until 48
worker_thread_1
worker_thread_2
g=-100
g=-2
g=-3
g=-4
main () at main.cpp:49
49                      usleep(1000000);
(gdb) until 48
worker_thread_2
[Switching to Thread 0x7ffff6f56700 (LWP 1195)]

Thread 2 "main" hit Breakpoint 2, worker_thread_1 (p=0x0) at main.cpp:11
11                      g = 100;
(gdb) until 48
worker_thread_2
worker_thread_1

Thread 2 "main" hit Breakpoint 2, worker_thread_1 (p=0x0) at main.cpp:11
11                      g = 100;
(gdb)
2
3
4
5
6
7
8
9
10
11
12
13
14
15
16
17
18
19
20
21
22
23
24
25
26
27
28
29
30
31
32
33
34
35
36
37
38
39
40
41
42
43
44
45
46
47
48
49
50
可以看到使用step模式锁定的主线程,在使用until命令时另外两个工作线程仍然有执行的机会。我们再次切换到主线程,然后使用next命令单步调试下试试。
(gdb) info threads
  Id   Target Id                               Frame
  1    Thread 0x7ffff7feb740 (LWP 1191) "main" 0x00007ffff701bfad in nanosleep () from /usr/lib64/libc.so.6
* 2    Thread 0x7ffff6f56700 (LWP 1195) "main" worker_thread_1 (p=0x0) at main.cpp:11
  3    Thread 0x7ffff6755700 (LWP 1196) "main" 0x00007ffff701bfad in nanosleep () from /usr/lib64/libc.so.6
(gdb) thread 1
[Switching to thread 1 (Thread 0x7ffff7feb740 (LWP 1191))]
#0  0x00007ffff701bfad in nanosleep () from /usr/lib64/libc.so.6
(gdb) set scheduler-locking step
(gdb) next
Single stepping until exit from function nanosleep,
which has no line number information.
0x00007ffff704c884 in usleep () from /usr/lib64/libc.so.6
(gdb) next
Single stepping until exit from function usleep,
which has no line number information.
main () at main.cpp:40
40                      g = -1;
(gdb) next

Thread 1 "main" hit Breakpoint 1, main () at main.cpp:41
41                      printf("g=%d\n", g);
(gdb) next
g=-1
42                      g = -2;
(gdb) next
43                      printf("g=%d\n", g);
(gdb) next
g=-2
44                      g = -3;
(gdb) next
45                      printf("g=%d\n", g);
(gdb) next
g=-3
46                      g = -4;
(gdb) next
47                      printf("g=%d\n", g);
(gdb) next
g=-4
49                      usleep(1000000);
(gdb) next
40                      g = -1;
(gdb) next

Thread 1 "main" hit Breakpoint 1, main () at main.cpp:41
41                      printf("g=%d\n", g);
(gdb)
2
3
4
5
6
7
8
9
10
11
12
13
14
15
16
17
18
19
20
21
22
23
24
25
26
27
28
29
30
31
32
33
34
35
36
37
38
39
40
41
42
43
44
45
46
47
48
49
50
51
52
53
54
55
56
57
58
59
60
61
62
63
64
65
66
67
68
69
70
71
此时我们发现设置了以step模式锁定主线程,工作线程不会在单步调试主线程时被执行,即使在工作线程设置了断点。
最后我们使用set scheduler-locking off取消对主线程的锁定,然后继续使用next命令单步调试。
(gdb) set scheduler-locking off
(gdb) next
worker_thread_2
worker_thread_1
g=-100
42                      g = -2;
(gdb) next
worker_thread_2
[Switching to Thread 0x7ffff6f56700 (LWP 1195)]

Thread 2 "main" hit Breakpoint 2, worker_thread_1 (p=0x0) at main.cpp:11
11                      g = 100;
(gdb) next
g=100
g=-3
g=-4
worker_thread_2
12                      printf("worker_thread_1\n");
(gdb) next
worker_thread_1
13                      usleep(300000);
(gdb) next
worker_thread_2
[Switching to Thread 0x7ffff7feb740 (LWP 1191)]

Thread 1 "main" hit Breakpoint 1, main () at main.cpp:41
41                      printf("g=%d\n", g);
(gdb) next
[Switching to Thread 0x7ffff6f56700 (LWP 1195)]

Thread 2 "main" hit Breakpoint 2, worker_thread_1 (p=0x0) at main.cpp:11
11                      g = 100;
(gdb) next
g=-1
g=-2
g=-3
g=-4
worker_thread_2
12                      printf("worker_thread_1\n");
(gdb)
2
3
4
5
6
7
8
9
10
11
12
13
14
15
16
17
18
19
20
21
22
23
24
25
26
27
28
29
30
31
32
33
34
35
36
37
38
39
40
取消了锁定之后,单步调试时三个线程都有机会被执行,线程 1 的断点也会被正常触发。
至此,我们搞清楚了如何利用set scheduler-locking选项来方便我们调试多线程程序。